You want your self-cleaning screens working their best every day. When you keep the screens tight and aligned, you stop blinding and pegging from slowing down your material flow. You get better performance, longer screen life, and fewer problems. Here’s what happens when you use the best self-cleaning screens and learn how to tension self-cleaning screens the right way:
- The cloths stay stretched and strong, so you catch more material.
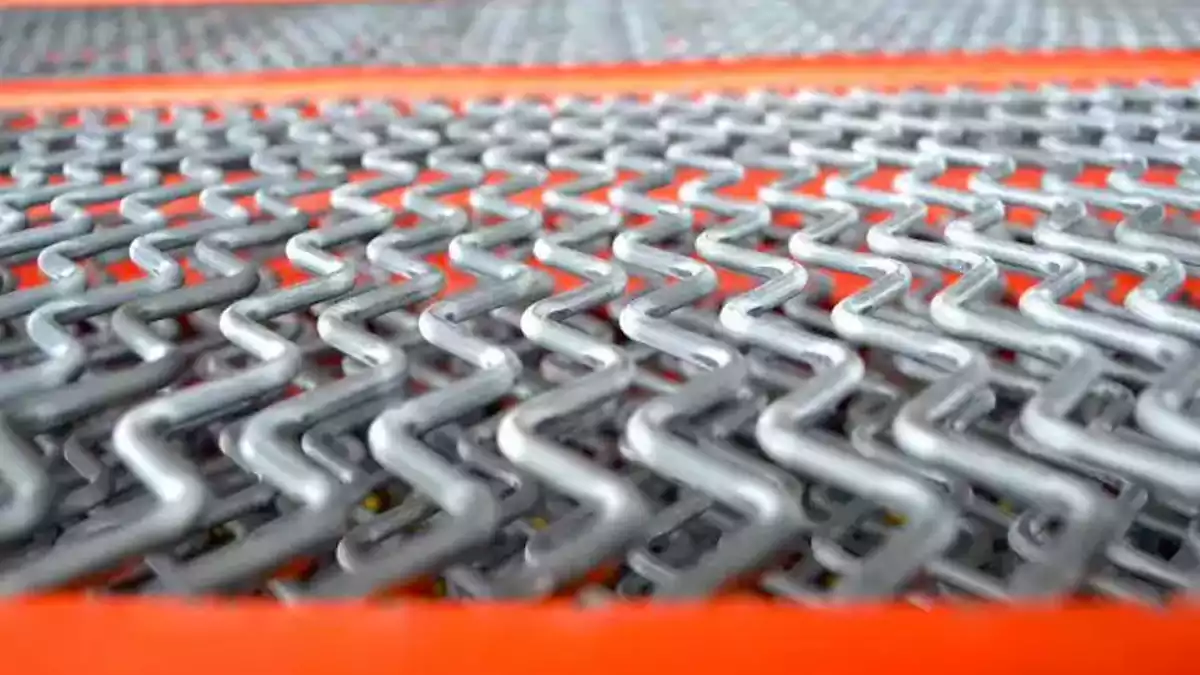
- Crimped wires vibrate and resist clogging.
- The screening surface lasts longer and works harder for you.
Key Takeaways
- Tightening self-cleaning screens the right way helps them work better by more than 9%. This makes materials move more easily.
- Keeping tension the same everywhere stops blinding. It helps every part of the screen work together. This avoids clogs and keeps things running well.
- Check screens often for damage and wear. Look at them every week to find problems early. This helps screens last longer.
- Use the correct tools for tightening and lining up screens. This gives even pressure and stops uneven wearing.
- Follow what the maker says for how tight to make screens. Do not make them too tight. This can hurt the mesh and make it not last as long.
- Keep screens clean and clear of buildup. This helps keep tension good and stops problems when working.
- Make a plan to take care of screens. Include regular checks for tension and cleaning. This helps screens work well for a long time.
- Always watch tension levels. Use tracking tools to see patterns and stop problems before they start.
Why Tension Matters
Screening Efficiency
You want your screening process to run smoothly and quickly. That’s where tension comes in. When you set the right tension on your self-cleaning screens, you help the mesh do its job. The triangular mesh design works best when one bar stays still and the other vibrates. This movement keeps the screen clean and lets more material pass through. You get fewer blockages and better results.
Studies show that adjusting tension can boost screening efficiency by over 9%. That means you move more material with less effort. You also keep the contact points between the material and the screen openings low. This helps you keep your operation running at top performance.
Meshes with low tension will reduce capacity, hold up product and be more prone to becoming blocked. A mesh which is tensioned properly and bonded to the frame with a high quality adhesive will keep its tension far longer than a mesh secured with a clip.
You want to keep your self-cleaning screens tight and secure. This keeps your screening efficiency high and your material flow steady.
Preventing Blinding
Blinding happens when material gets stuck in the screen openings. This slows down your work and makes your screens less effective. You can stop blinding by making sure your self-cleaning screens have the right tension. When the wires are tight, they vibrate more. This vibration shakes loose any material that tries to stick.
Uniform tension is key. If you have loose spots, you get uneven vibration. That means some parts of your screen will clog while others stay clear. You want every part of your screen working together. Good tension and even contact between the rubber and the screen help you avoid blinding and keep your screening efficiency up.
Screen Longevity
You want your screens to last as long as possible. Proper tension helps you do that. Tensioned screens, especially those with strong edges, are built to hold a certain amount of force. This keeps them working well for a long time. If you don’t set the right tension, your screens can wear out fast. You might see panels fail before their time.
Here’s what you should remember:
- Proper installation helps your screens last longer.
- If you set the wrong tension, you get more wear and tear.
- Always follow the manufacturer’s advice for tensioning.
When you take care of your self-cleaning screens, you get more life out of them. You also keep your screening efficiency high and avoid costly downtime.
Preparing for Tension and Alignment
Before you start tensioning your self-cleaning screens, you need to get everything ready. Good preparation helps you avoid mistakes and keeps your screens working longer. Let’s walk through the steps together.
Inspecting Self-Cleaning Screens
Check for Damage
First, look at your screens closely. You want to spot any broken wires, worn edges, or loose hooks. Damaged parts can mess up your tension and alignment. If you see any problems, replace those parts before you move on. This step saves you time and trouble later.
Clean Deck Surface
Next, clean the deck surface where you will install the screen. Dirt, old material, or leftover pieces can cause uneven tension. Use a brush or air hose to clear everything away. A clean deck helps you get the best alignment and keeps your screen sitting flat.
Tip: Cleaning the deck also helps you spot any hidden damage or weak spots.
Tools for Tensioning
You need the right tools for the job. Using the correct tools makes tensioning easier and helps you get perfect alignment every time.
Tensioning Tools
Grab your tensioning wrenches or torque tools. These help you tighten the nuts evenly. If you use the wrong tool, you might over-tighten or leave some spots loose. That can ruin your alignment and shorten your screen’s life.
Alignment Tools
You also need tools to check alignment. A straight edge or laser level works well. Place the straight edge across the screen to see if it sits flat. If you notice gaps or high spots, adjust the screen until you get good alignment. This step stops uneven wear and keeps your screen working smoothly.
- Check the alignment of the screen media before you start tensioning.
- Make sure the straight and crimped wires line up correctly. This helps the wires vibrate and clean themselves.
- Good alignment means every part of the screen does its job.
Note: If you skip alignment, you might see one side of the screen wear out faster than the other.
When you focus on alignment, you get better vibration and less blinding. Straight wires give support, while crimped wires move and shake loose material. Both need proper alignment to work together. Take your time with this step. You will see the difference in performance and screen life.
How to Tension Self-Cleaning Screens
Positioning Screen Media
You want to start with the right setup. Place your self-cleaning screens flat on the deck. Make sure the mesh lines up with the support bars. If you see any dents or bumps, fix them before you move on. Lay the screen so the straight wires and crimped wires sit in their correct spots. This helps with tension and alignment later.
Tip: Use a laser rangefinder to check the screen’s size. You want a tolerance of about 1.5mm. This keeps your self-cleaning screens working at peak performance.
Securing Screen
Now you need to lock the screen in place. Follow these steps to keep tension steady during operation:
- Measure tension with a reliable meter before you start. This helps you avoid problems with print defects or uneven material flow.
- Pick the right frame type. Rigid aluminum frames or re-tensionable roller frames give you better stability and durability.
- Control your environment. Stable temperature and humidity help your mesh keep its tension.
- Retire or re-stretch worn screens. If a screen can’t hold uniform tension, replace it. This stops quality issues before they start.
- Use a tension tracking system. Digital tracking helps you monitor tension trends and keep your production standards high.
When you secure your self-cleaning screens, you set yourself up for success. Good tension and alignment mean fewer problems and better results.
Applying Uniform Tension
You want every part of your screen to work together. Uniform tension stops blinding and pegging. Here’s how to tension self-cleaning screens the right way:
- Read the manufacturer’s instructions. Each brand has its own steps for tensioning.
- Lay the screen flat and check for dents. Dents should not go over 0.3mm per square meter.
- Use the center-and-spoke method. Fix the center first, then work outward. This spreads tension evenly.
- Tighten the inner clamp rail bolts first. Then move to the outer bolts. The screen should feel tight but not stretched too far.
- Do a string test. Check for gaps between the screen and support bars. Adjust if you find any.
- Run a no-load vibration test. The screen should move evenly after installation.
- Set up a maintenance plan. Check tension and wear often to keep your self-cleaning screens in top shape.
Manufacturer Guidelines
You need to follow the manufacturer’s advice for tensioning. Each company may have different torque values for clamps. Always check the operator’s manual for the exact settings. Even clamping pressure around the flanges is crucial. If you skip this step, you risk uneven tension and alignment.
- Follow recommended torque settings for clamps.
- Check the instruction manual for your specific self-cleaning screens.
- Make sure you get even clamping pressure all the way around.
Avoid Over-Tension
You don’t want to stretch your screens too far. Over-tensioning can damage the mesh and shorten its life. Here’s how you can prevent it:
- Use closed-loop tension control systems. These keep tension levels steady.
- Calibrate your tension control systems often. This helps you avoid over-tensioning or under-tensioning.
- Monitor tension levels all the time. If you see changes, fix them right away.
Note: If you tighten the nuts and they won’t turn anymore, give them a 180-degree turn. This helps you reach the right tension without going too far.
When you learn how to tension self-cleaning screens, you get better performance and longer screen life. You also avoid costly repairs and downtime. Keep your tension and alignment in check, and your self-cleaning screens will keep working hard for you.
Checking Tension and Alignment
You want your self-cleaning screens to work at their best. After you finish tensioning, you need to check both tension and alignment. This step helps you catch problems early and keeps your screens running smoothly.
Start by looking at the screen surface. Push down gently on the center plate. If the screen feels loose or sags, you may need to adjust the tension nuts. Tighten each nut a little at a time. When you reach the point where the nut will not turn anymore, give it a 180-degree turn. This method helps you get the right tension without damaging the mesh.
Next, check the alignment. Use a straight edge or a laser level. Place it across the screen. Look for any gaps or high spots. If you see uneven areas, adjust the screen until it sits flat. Good alignment means every part of your self-cleaning screens can vibrate and clean itself.
Here are some best practices you should follow after installing self-cleaning screens:
| Best Practice | Description |
|---|---|
| Check screen alignment and tension often | Regular checks ensure optimal performance. |
| Keep screens clean and free from buildup | Prevents operational issues and maintains efficiency. |
| Lubricate moving parts and inspect for wear | Ensures longevity and smooth operation. |
You want to make these checks part of your routine. Regular tension checks help you spot loose areas before they cause blinding or pegging. Keeping your screens clean stops material from building up and blocking the mesh. Lubricating moving parts and looking for wear keeps your self-cleaning system working longer.
Tip: Set a reminder to check tension and alignment every week. This habit helps you catch problems early and keeps your self-cleaning screens in top shape.
If you notice uneven wear or strange noises, stop and inspect the tension right away. Fixing small issues now saves you time and money later. You want your self-cleaning screens to last, so never skip these checks.
Checking tension and alignment is not just a one-time job. Make it part of your regular maintenance. You will see better performance, fewer breakdowns, and longer life from your self-cleaning screens.
Troubleshooting Tension Issues
You want your self-cleaning screens to run smoothly. Sometimes, tension problems pop up and slow things down. If you know what to look for, you can fix issues fast and keep your operation moving.
Signs of Improper Tension
When tension is off, your screens start showing signs. You might notice these problems:
- Loose screen media that moves or sags during operation
- Shiny hooks or black markings on the underside of spent screens
- Abnormal sounds, like rattling or squeaking, when the machine runs
Uneven Wear
Uneven wear is a big clue. If one side of your self-cleaning screens wears out faster than the other, tension is probably not even. You might see thin spots or holes in certain areas. This means the screen is not sitting flat or tight. You should check the tension nuts and alignment right away.
Excessive Noise
Strange noises can mean trouble. If you hear rattling, banging, or squeaking, stop and inspect your screens. These sounds often come from loose wires or uneven tension. Sometimes, the screen vibrates too much in one spot. You want to catch these problems early before they cause bigger damage.
Tip: Listen to your machine during operation. If you hear anything unusual, check the tension and alignment first.
Correcting Errors
You can fix tension problems with a few simple steps. Start by turning off the machine and letting it cool down. Use your tensioning tools to check each nut. Tighten any loose nuts a little at a time. Push down on the center plate to test for sagging. If you find uneven spots, adjust the alignment with a straight edge.
Here’s a quick checklist to help you correct errors:
| Step | What to Do |
|---|---|
| Inspect screen | Look for loose wires or damage |
| Check tension nuts | Tighten nuts evenly |
| Test alignment | Use a straight edge or laser |
| Listen for noise | Fix any rattling or squeaking |
If you see shiny hooks or black marks, replace worn parts. Always follow the manufacturer’s guidelines for tensioning. This keeps your self-cleaning screens working at their best.
Preventing Recurrence
You want to stop tension problems before they start. Regular monitoring helps you catch issues early. Set a schedule to check tension and alignment every week. Clean your screens often to prevent buildup. Lubricate moving parts and inspect for wear.
- Monitor tension and alignment regularly
- Clean screens to prevent blinding and pegging
- Replace worn parts before they fail
Note: Keeping a log of tension checks helps you spot patterns and prevent future problems.
If you stay on top of maintenance, your self-cleaning screens will last longer and work better. You save time, money, and avoid downtime.
Maintenance for Self-Cleaning Screens
You want your self-cleaning screens to work well every day. Taking care of your screens helps them last longer and stops expensive problems. Let’s look at the steps you should follow to keep your screens in good shape.
Inspection Schedule
Make a plan to check your screens often. You should look at your screens at least once a week. Check for loose wires, worn edges, or mesh that sags. If you find a problem, fix it right away. Checking your screens often helps you find small problems before they get worse.
- Test the tension on all screens every week.
- Look at hooks and edges for signs of wear.
- Watch for blinding or pegging.
- Use a straight edge to check alignment.
Tip: Write your inspection results in a logbook. This helps you see changes and spot problems over time.
Cleaning Tips
Keeping your screens clean is very important. Dirt and leftover material can hurt tension and slow your work. Use cleaning methods that are gentle and keep tension steady.
Here is a table with cleaning methods and jet cleaning settings that work best:
| Cleaning Method | Description |
|---|---|
| Self-Cleaning Screens | These designs save money and stop blinding and plugging while keeping things running well. |
| Jet Cleaning Parameters | Optimal Values |
|---|---|
| Incident Pressure | 0.3 Mpa |
| Nozzle Diameter | 3 mm |
| Nozzle Diffusion Angle | 80° |
Use a jet cleaner with the right pressure and nozzle size. This keeps your screens clean without changing the tension. Always clean the deck surface before you start working. If you see buildup, clean it off right away.
Note: Do not use harsh chemicals or rough brushes. These can hurt your screens and mess up the tension.
Retension or Replace
Sometimes, screens get loose over time. You need to retension them to keep them working well. If a screen cannot stay tight, you should replace it. Do not wait for the screen to break.
- Retension screens if you see sagging or uneven shaking.
- Replace screens with broken wires or worn hooks.
- Always follow the manufacturer’s rules for tensioning and replacing screens.
Here is a simple checklist for good maintenance and reliability:
- Check screens every week for tension and wear
- Clean screens every day with the right methods
- Retension or replace screens when needed
- Write down all maintenance work
- Follow the manufacturer’s instructions
Regular maintenance keeps your self-cleaning screens working their best. You stop problems like blinding, pegging, and uneven wear. Your screens last longer and you save money over time.
Conclusion
You want your self-cleaning screens to work well. Here are some important steps to follow. Look at the table for easy tips:
| Key Takeaways for Tensioning Self-Cleaning Screens | Consequences of Poor Tension |
|---|---|
| Make sure the hook type fits your screen frame | Wires can get tired early |
| Always use the right tensioning method | Separation may not be right |
| Make sure panels are flat and tight on the deck | More pegging or blinding |
Do regular maintenance and check tension and alignment often. If you need help or want special self-cleaning screens, contact our team. You can call, email, or message us on WhatsApp. We answer quickly and give expert help.
FAQ
How often should you check the tension on self-cleaning screens?
You should check the tension every week. Regular checks help you catch problems early. This keeps your screens working well and stops downtime.
What tools do you need for proper tensioning?
You need a tensioning wrench, a straight edge, and a torque meter. These tools help you set the right tension and keep your screens flat.
Can you reuse a screen that has lost tension?
No, you should not reuse a screen that cannot hold tension. Replace it to avoid poor performance and costly repairs.
What happens if you over-tighten the screen?
Over-tightening can damage the mesh and shorten its life. You might see broken wires or uneven wear. Always follow the manufacturer’s guidelines.
How do you know if your screen is aligned correctly?
Use a straight edge or laser level. If the screen sits flat with no gaps or high spots, you have good alignment.
Why does blinding happen even with self-cleaning screens?
Blinding can happen if tension is uneven or if the screen is dirty. Clean your screens often and check tension to prevent this issue.
What is the best way to clean self-cleaning screens?
Use a jet cleaner with the right pressure and nozzle size. Avoid harsh chemicals or rough brushes. Gentle cleaning keeps tension steady.
Who can you contact for expert help or custom screens?
You can reach out to our team by phone, email, or WhatsApp. We answer quickly and offer expert support for your needs.